If you have used both Windows and Mac, you already know that there is a huge difference between the two operating systems. While Windows is easy to operate, Mac, on the other hand, needs a little bit of practice. In case, you are shifting from Windows to Mac; it may take some time for you to get accustomed with the Mac OS. Since you are new Mac user chances are that you don’t know the steps to take a screenshot on your device. But you need not worry anymore as you are lucky enough to have landed on this page. There are different methods you can use to take a screenshot on your Mac device. The advantage of using Mac is that you can even take a screenshot of a selected area. To help you out, we have provided the complete guide following which you can learn to take screenshots on your new Mac device. Taking A Screenshot On Mac Now that you are using Mac, you must have realized how fast the keyboard commands are. Using the keyboard commands is considered to be the best and the fastest way of taking a screenshot on a Mac device. This method is followed by the majority of the Mac users out there. The details of the same are provided below. Capturing The Full Screen You can capture the entire screen using specific keyboard commands, just like you did on your Windows device. Here are the steps you need to follow. First, you need to press the command + shift + 3 keys simultaneously. The copy of the screen is now saved to your clipboard. You can follow the same combination just without the ‘command’ key to save the screenshot in the PNG format on your device. In case, you are using the latest version of Mac OS, Mojave; you can see the preview of your screenshot in the corner of your screen. If you click on the same, you can easily access your editing tools. Mac users also get to enjoy the feature called ‘Stacks’ which groups similar images or files on your device. For example, the screenshots you take. Taking Screenshots With Grab If you are having a hard time memorizing all the keyboard, you can take advantage of the program called Grab. This particular program comes pre-installed in all the Mac devices. With the help of this program, you can easily take screenshots on your Mac computer. Not just that, but the software also provides you with a feature called ‘time-delayed screenshots.’ Using this feature, you can first prepare the screen and then take a screenshot of the same. In case, you don’t know how to use this amazing program; you can follow the steps given below. At first, you need to launch the program on your device. You can either use the keyboard shortcuts listed at the side of respective command, or you can simply go with the Capture menu system. Timed Screenshots As already mentioned above, you can use the program to even take timed screenshots. This feature provides you with a 10-second delay before you capture the screenshot. This means you can have enough time to adjust the screen the way you want before capturing it. Here are the steps that need to be followed. At first, you launch the program. Locate the option ‘Timed Screenshot’ from the program’s menu. You can also choose the alternative way and press command + shift + Z. You should know that your mouse cursor will not be shown in the captured image. If you want it to be visible in the screenshot, you need to go to ‘Preferences’ which you can find in the menu and then click on the mouse icon shown on the pop-up window. For users who don’t want to memorize the keyboard shortcuts, they can find this program helpful. Capturing A Selected Area After we have discussed the method to capture the full screen, it’s time that we move on to the details of capturing only a selected portion of your screen. All you need to do is follow the steps given below. Press the shortcut: command + shift + 4 keys simultaneously. Now use your mouse to select the area that you want to capture. You can even fine-tune the selected area by tapping the spacebar, which will allow you to select an open menu or capture the entire screen. After you follow the steps mentioned, the captured image will be saved in the clipboard. If you want to save the picture in PNG format, cancel pressing the ‘command’ button. Taking A Screenshot With Preview Preview is the default tool that comes installed in your Mac device. Using this tool, you can open ever type of file you want. From PDF files to images, you can open everything you want on your Mac desktop. The tool comes with plenty of features that you can use. For example, you can even use the tool to edit your images as well. Similarly, you can use the tool to take a screenshot of your screen too. Here are the steps to be followed. Open the program. Select the File option from the menu bar. Now select the option ‘take screenshot’ from the drop-down menu. You will be shown three options: from selection, from the window and the entire screen. Select any of the options according to your need, and there you have your image captured. Now that you know to capture screenshots on your Mac device, you can capture anything you want and save it on your desktop. You can use any of the methods that seem easier to you. However, we would recommend you to use the keyboard shortcut method as it is the fastest way of capturing screenshots. But then again, the choice is yours, so you be the decider.

How To Take A Screenshot On A Mac?

If you have used both Windows and Mac, you already know that there is a huge difference between the two operating systems. While Windows is easy to operate, Mac, on the other hand, needs a little bit of practice. In case, you are shifting from Windows to Mac; it may take some time for you to get accustomed with the Mac OS.

Since you are new Mac user chances are that you don’t know the steps to take a screenshot on your device. But you need not worry anymore as you are lucky enough to have landed on this page. There are different methods you can use to take a screenshot on your Mac device. The advantage of using Mac is that you can even take a screenshot of a selected area. To help you out, we have provided the complete guide following which you can learn to take screenshots on your new Mac device.

Taking A Screenshot On Mac

Now that you are using Mac, you must have realized how fast the keyboard commands are. Using the keyboard commands is considered to be the best and the fastest way of taking a screenshot on a Mac device. This method is followed by the majority of the Mac users out there. The details of the same are provided below.

Capturing The Full Screen

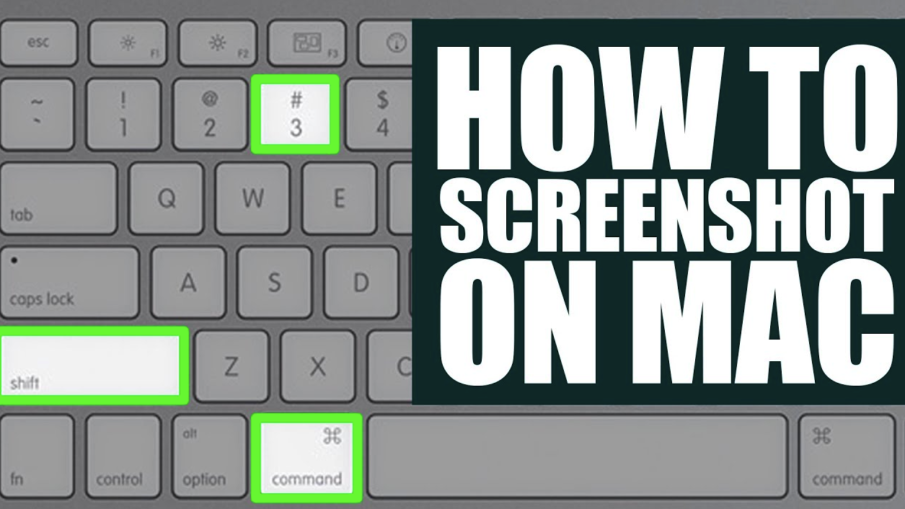
You can capture the entire screen using specific keyboard commands, just like you did on your Windows device. Here are the steps you need to follow.

macbook

  1. First, you need to press the command + shift + 3 keys simultaneously.
  2. The copy of the screen is now saved to your clipboard.
  3. You can follow the same combination just without the ‘command’ key to save the screenshot in the PNG format on your device.

In case, you are using the latest version of Mac OS, Mojave; you can see the preview of your screenshot in the corner of your screen. If you click on the same, you can easily access your editing tools. Mac users also get to enjoy the feature called ‘Stacks’ which groups similar images or files on your device. For example, the screenshots you take.

Taking Screenshots With Grab

If you are having a hard time memorizing all the keyboard, you can take advantage of the program called Grab. This particular program comes pre-installed in all the Mac devices. With the help of this program, you can easily take screenshots on your Mac computer. Not just that, but the software also provides you with a feature called ‘time-delayed screenshots.’ Using this feature, you can first prepare the screen and then take a screenshot of the same. In case, you don’t know how to use this amazing program; you can follow the steps given below.

mac

  1. At first, you need to launch the program on your device.
  2. You can either use the keyboard shortcuts listed at the side of respective command, or you can simply go with the Capture menu system.

Timed Screenshots

As already mentioned above, you can use the program to even take timed screenshots. This feature provides you with a 10-second delay before you capture the screenshot. This means you can have enough time to adjust the screen the way you want before capturing it. Here are the steps that need to be followed.

mac

  1. At first, you launch the program.
  2. Locate the option ‘Timed Screenshot’ from the program’s menu. You can also choose the alternative way and press command + shift + Z.

You should know that your mouse cursor will not be shown in the captured image. If you want it to be visible in the screenshot, you need to go to ‘Preferences’ which you can find in the menu and then click on the mouse icon shown on the pop-up window. For users who don’t want to memorize the keyboard shortcuts, they can find this program helpful.

Capturing A Selected Area

After we have discussed the method to capture the full screen, it’s time that we move on to the details of capturing only a selected portion of your screen. All you need to do is follow the steps given below.

mac

  1. Press the shortcut: command + shift + 4 keys simultaneously.
  2. Now use your mouse to select the area that you want to capture.
  3. You can even fine-tune the selected area by tapping the spacebar, which will allow you to select an open menu or capture the entire screen.

After you follow the steps mentioned, the captured image will be saved in the clipboard. If you want to save the picture in PNG format, cancel pressing the ‘command’ button.

Taking A Screenshot With Preview

Preview is the default tool that comes installed in your Mac device. Using this tool, you can open ever type of file you want. From PDF files to images, you can open everything you want on your Mac desktop. The tool comes with plenty of features that you can use. For example, you can even use the tool to edit your images as well. Similarly, you can use the tool to take a screenshot of your screen too. Here are the steps to be followed.

mac

  1. Open the program.
  2. Select the File option from the menu bar.
  3. Now select the option ‘take screenshot’ from the drop-down menu.
  4. You will be shown three options: from selection, from the window and the entire screen. Select any of the options according to your need, and there you have your image captured.

Now that you know to capture screenshots on your Mac device, you can capture anything you want and save it on your desktop. You can use any of the methods that seem easier to you. However, we would recommend you to use the keyboard shortcut method as it is the fastest way of capturing screenshots. But then again, the choice is yours, so you be the decider.
About Govind Dhiman 2041 Articles
Govind Dhiman is a young and passionate entrepreneur who hails from Haryana, India. He founded Journalistpr.com to help journalists in the world of journalism grow their presence and amplify their voice on social media. Govind believes that content marketing is one of the most effective ways for businesses to establish themselves as authorities in their niche market space by publishing quality content on a consistent basis with an eye towards key metrics like engagement and shares.

Leave a Reply

Your email address will not be published.


*