When you are writing a document for your work or academic project, you want to make sure that it’s properly formatted. Everything is added as per the standards of well-written documents. Subscript and superscript are also important objects that we many times have to add. Let’s see how to do subscript in Google Docs along with superscript.
How to do Subscript In Google Docs
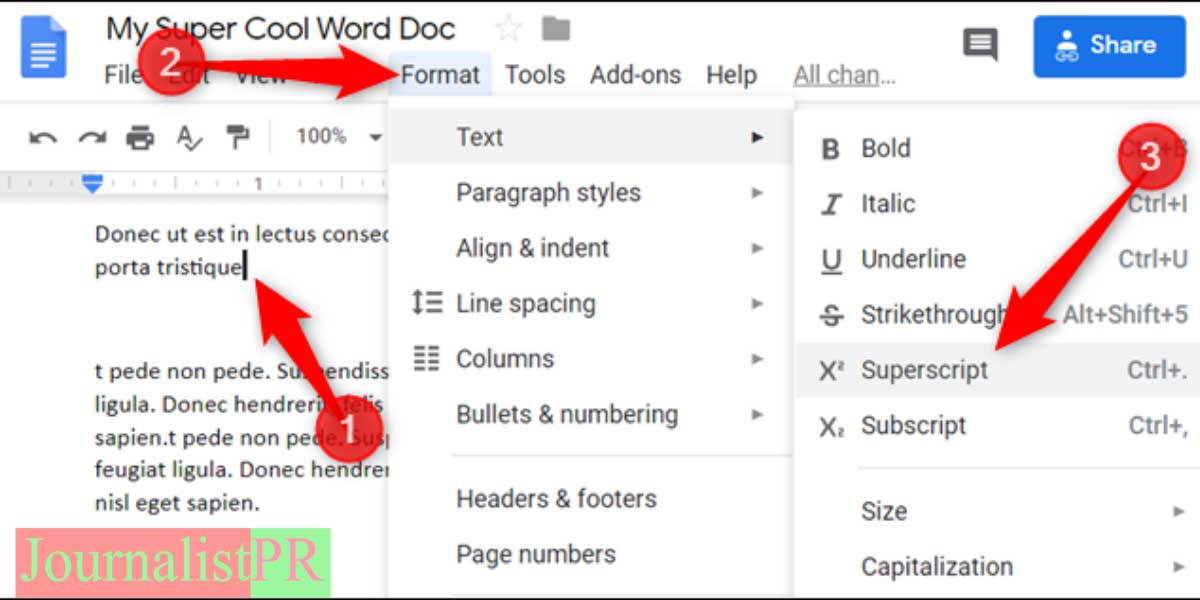
Start your web browser and open Google Docs or Slides from the search engine. Open a blank document from the website. If you want to know how to do subscript in Google Docs, pick the text portion and put the cursor over where you want it to be in the document.
Then, Format > Text and then choose anything from “Superscript” or “Subscript” from the options available. The method is the same for both.
Alternative Ways to Add Superscript and Subscript in the Docs
- If you know how to use keyboard shortcuts, this first alternate method adds subscript and superscript. Press Ctrl+ or Cmd+ is depending upon whether you use Windows or macOS. Use Ctrl+. And Cmd+. For superscript and Ctrl+, and Cmd+, for subscript.
- Another way of doing this is by using the special characters from the menu. The special characters tool is built-in in the Google Docs. From the menu, you can add many other characters in the text along with subscript and superscript. Open Google Docs or Slides in the browser. Select the blank doc, click on the “Insert” tab from the menu and choose “Special Characters.”
- Once it opens, select the drop-down box from the right and click the “Superscript/subscript” option. Then choose whichever symbol you want to add to the doc.
Top 5 Writing Tips for Writing on Google Docs
We know that everyone wants to become a master of words, but that is not easy if you don’t write smart. There are hundreds of tips to help you write better, but we want to share some of the top 5 suggestions you can use while editing in Google Docs.
#1. If you want to shift a portion of text while editing a doc in Google Docs, you don’t have to use the ancient technique of cutting and pasting the text. There’s a faster way to do that: Highlight the portion you want to shift, click, and drag using the mouse. There’s another way to do it: place the cursor inside any part, press down Alt and Shift simultaneously, and use arrow keys to shift it.
#2. If you want to make your text slightly larger or smaller, there’s a simple method to do it. Press down Ctrl and Shift, then click on the period key to increase the font size. You can decrease the size by using a comma instead of period.
#3. If you want to apply the formatting of one portion of text to another, you have to use a simple Google Docs method: See the paint roller icon in the upper-left corner in the toolbar of Docs? Select the portion you want to, click the paint roller icon and then click on any paragraph you want to modify. If you want the process to apply to more than one section, then instead of clicking the paint roller icon single time, double-click.
#4. Tired of remembering all the shortcuts and functions of the keyboard in Google Docs? Then use the Alt-/ shortcut to see the list of all the functions and shortcuts.
#5. You can make your editing simpler by using the smartness of Docs. Click on the View menu and then “Show Document Outline” – or use the shortcut Ctrl-Alt-H or Cmd-Alt-H. The command creates a ready-made outline on the left side of the screen. You can pick whichever section you want to open it in the doc.
You can use the above tips to make sure that you become a writing pro. If you want to know anything more, drop the comments below. Follow us for getting interesting stuff on writing tips and techniques and much more.


Leave a Reply